How to Make Money Online On YouTube - Monetization Guide

Making money online has never been easier, and YouTube is the best platform to do so. What started as a video-sharing platform has become a full time income source for millions of creators to make money online.
You can start with multiple niches like comedy skits, gaming streams, meme shorts, animated stories, and informative channels. There’s room for every type of creator to build an audience and earn money doing what they love.
The best part? You don’t need a camera crew, fancy editing software, or even animation skills to get started. In this blog, we’ll cover everything you need to make money online using YouTube.
Table of Contents
- › How to Make a YouTube Channel?
- › How Much Does YouTube Pay Per View?
- › Estimated YouTube Earnings by View Count
- › How to Make Money Online with AI Animation Tools
- › Create Animated Videos For YouTube Using AutoDraft AI
- › Step 1: Create a Storyline for Your Video
- › Step 2: Open AutoDraft AI - Free AI Animation Generator
- › Step 3: Create or Select AI Cartoon Characters
- › Step 4: Design Your Story Backgrounds and Scenes
- › Step 5: Animate Characters
- › Step 6: Add AI Generated Audio and Voiceovers
- › Step 7: Create a Full Animated Story
- › How to Upload YouTube Videos Online
- › How Does the YouTube Partner Program Work
- › What Content Earns Money On YouTube
- › Key Takeaways – Start Creating, Start Earning
How to Make a YouTube Channel?
Starting a YouTube channel is easier than you think—but doing it the right way sets you up for long-term success. Here’s how to start:
-
Pick a Niche: Decide what your channel will focus on—cartoon cats, AI-generated kids stories, meme skits, or even rhyming characters. Stick to one theme so your audience knows what to expect.
-
Create a Google Account: Go to YouTube and log in with your Google account. If you don’t have one, you’ll need to create it first.
-
Set Up Your Channel: Click on your profile icon → “Your Channel” then “Customize Channel.” Add a name, channel icon, and banner. Keep it fun, recognizable, and niche-relevant.
-
Add Channel Description: Use relevant keywords and explain what viewers can expect.
-
Verify and Enable Monetization: From your YouTube account, navigate to YouTube Studio → Settings → Channel → Feature eligibility → Enable monetization (if eligible)
Verify your account with a phone number to complete the setup. Once you're done, your channel is ready for uploads.
Add Your YouTube Profile Picture
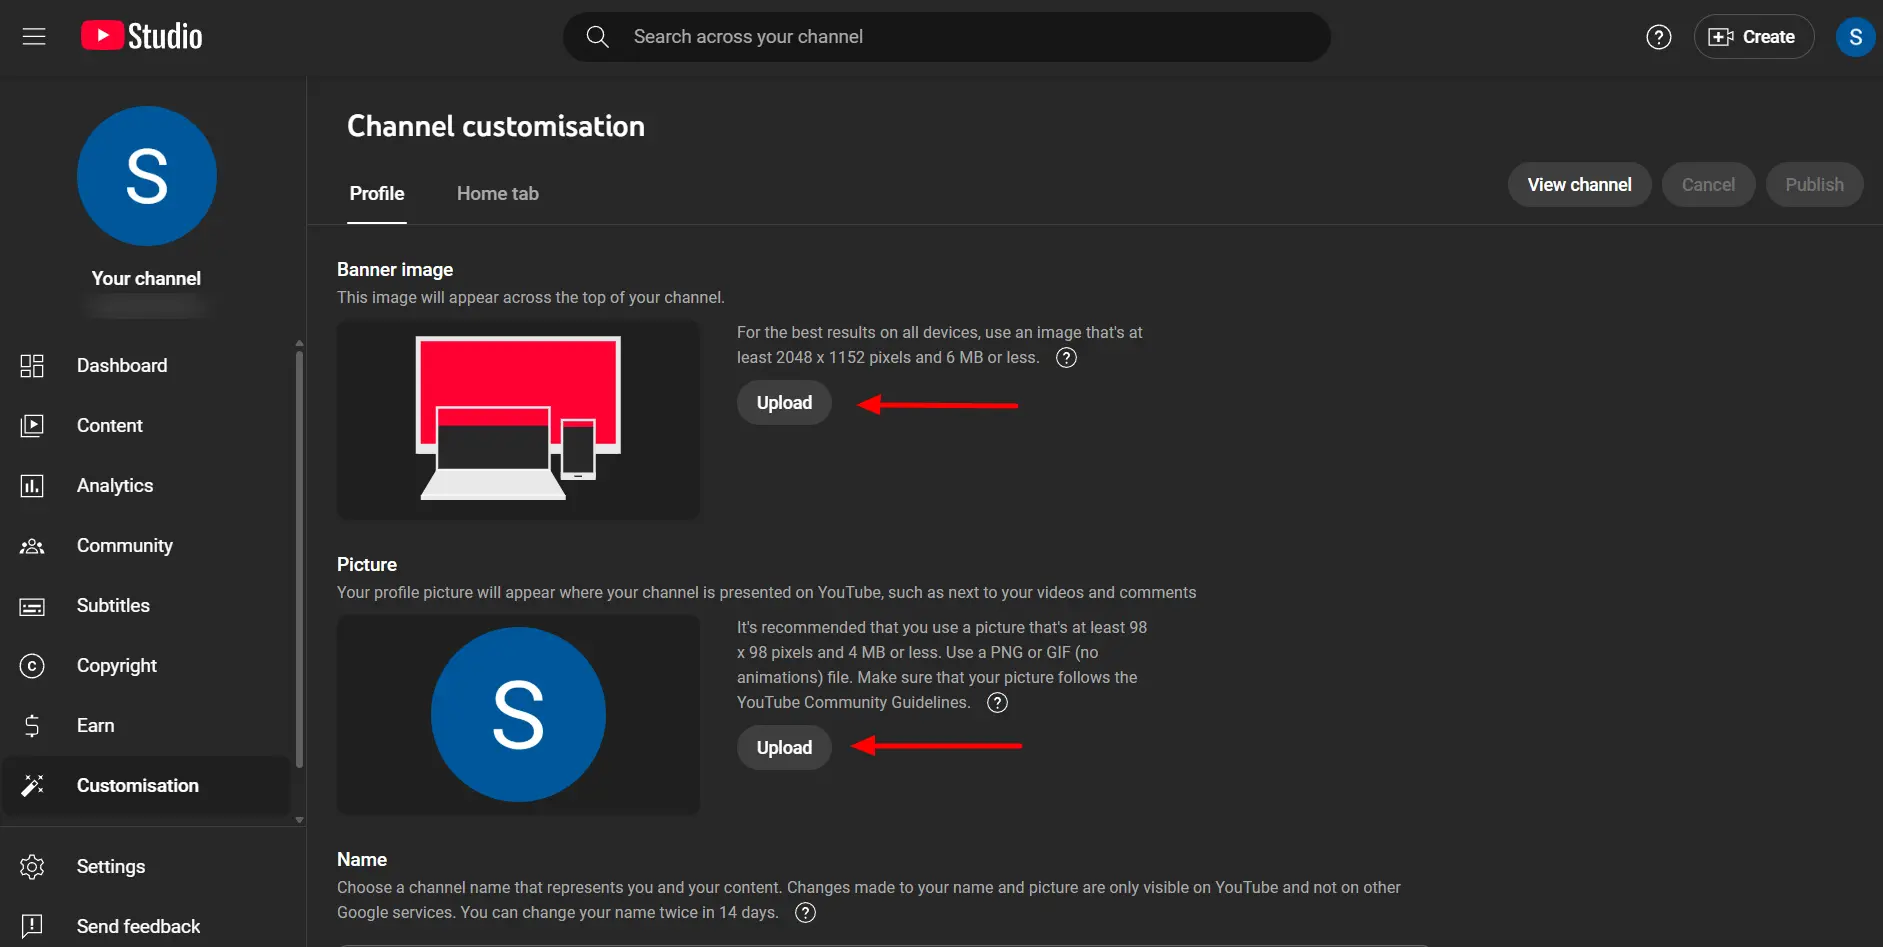
Your YouTube profile picture, also known as channel icon, represents your brand and appears next to your videos, comments, and in search results. To add or change it, go to “Customize Channel → Branding” and upload a high-quality image that stands out.
The recommended size for a YouTube profile picture is 800 x 800 pixels, in square format. YouTube displays this icon as a circle, so make sure your key design elements are centered to avoid them being cut off.
Add a YouTube Channel Banner
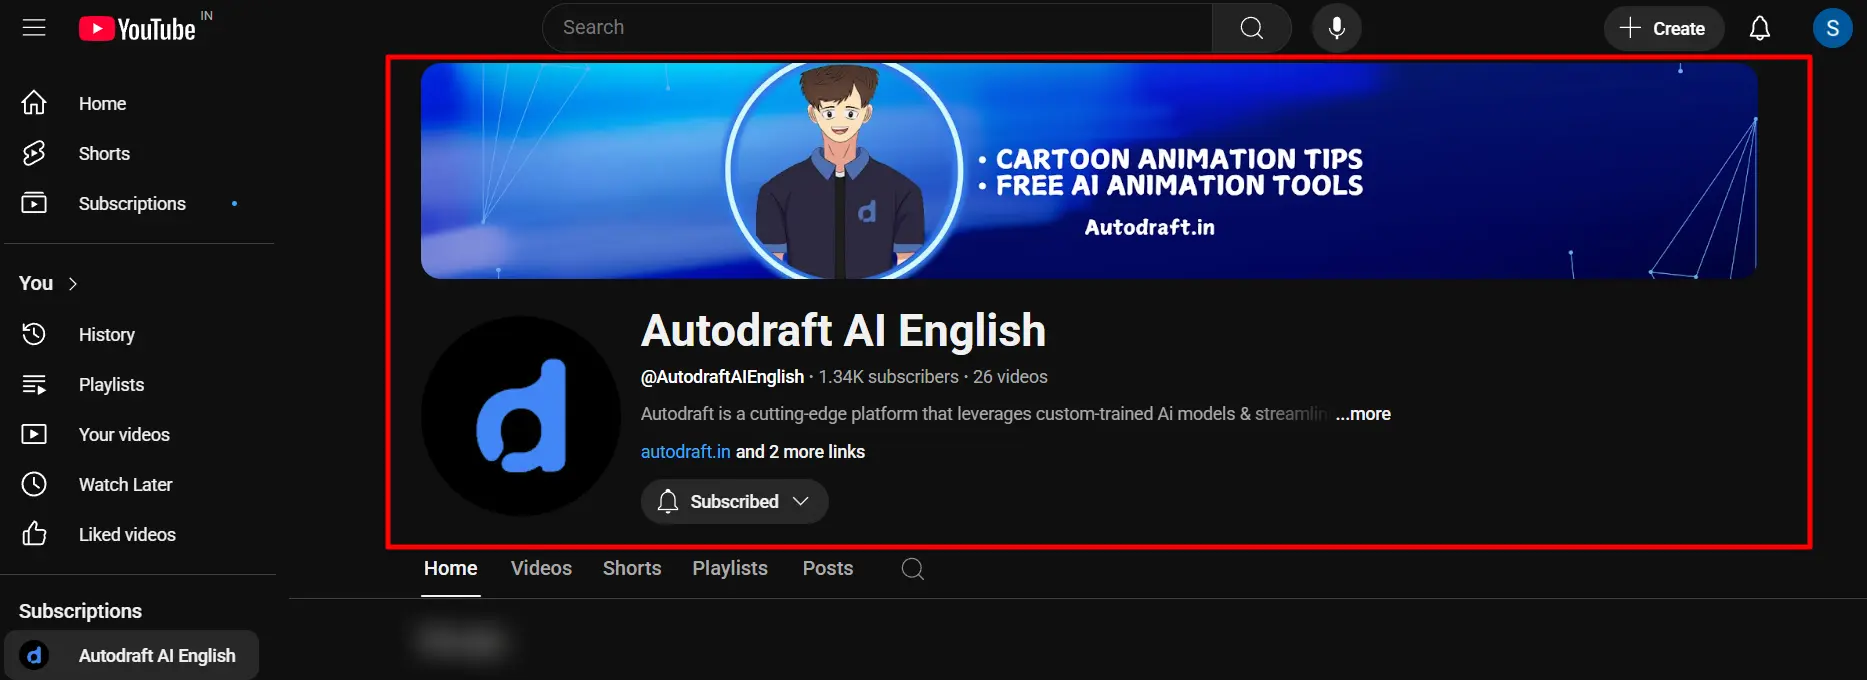
The channel banner is the large, horizontal image at the top of your YouTube page—your first visual impression. It should reflect your content style and be visually aligned with your niche.
Recommended YouTube Banner Size
The recommended banner size is 2560 x 1440 pixels with a 16:9 aspect ratio. However, the crucial safe area—where text and logos won’t be cropped on smaller screens is 1546 x 423 pixels, centered within the banner.
Always ensure your branding elements fall inside this safe zone to display properly across all devices, including mobile phones, tablets, and TVs.
How Much Does YouTube Pay Per View?
This is one of the most common questions new creators ask after uploading their first few animations— how much will I earn from views?
1. YouTube Doesn’t Pay Per View—It Pays Per Ad View
Earnings come primarily from advertisements shown on your videos, not from the number of total video views. If a viewer watches or interacts with an ad, you get paid.
No ad = no earnings for that view.
2. Average Revenue Per View:
CPM (Cost Per 1,000 Impressions): Ranges from $2 to $12+, depending on your niche, location, and audience demographics.
-
This works out to about $0.002 to $0.012 per view.
-
For 1 million views, creators typically earn between $3,000 to $6,000 though it can vary widely
3. Shorts Views Earn Less:
If you're creating YouTube Shorts, expect much lower earnings per view. 1 million Shorts views may generate only $50 to $100, due to different monetization rules and fewer ad placements.
Estimated YouTube Earnings by View Count
| Views | Estimated Earnings (USD) |
|---|---|
| 1,000 views | $2 – $12 |
| 10,000 views | $20 – $120 |
| 100,000 views | $120 – $800 |
| 1 million views | $3,000 – $6,000 (typical range) |
| 1 million Shorts views | $50 – $100 |
How to Make Money Online with AI Animation Tools
Earning money on YouTube doesn’t require a studio setup anymore. With the rise of AI tools, anyone can start producing high-quality content quickly, and that means more uploads, more reach, and more revenue.
Tools like AutoDraft AI simplify every part of the process. You can generate animated videos, characters, voiceovers, and even thumbnails in just a few clicks. Instead of spending hours on editing, you spend minutes.
More Output = More Views = Maximum chances at monetization.
Popular YouTube Formats that are Trending
- ✅ Meme shorts
- ✅ Funny Kids content
- ✅ Quick animated stories
All of these can be produced faster using AI, letting you focus on creativity, not complexity.
Create Animated Videos For YouTube Using AutoDraft AI
Autodraft AI is a powerful, AI-driven animation and design platform that streamlines the creation of high-quality animated content, cartoons, webtoons, and visual storytelling.
It is a full-stack video production system. Whether you’re running a kids channel, a meme page, or a faceless tutorial channel, here’s how each feature helps you **create, publish, **and scale high-performing content, without any traditional animation skills.
Step 1: Create a Storyline for Your Video
Before you start animating, get clear on the story you want to tell. This could be a funny skit, an educational rhyme, a reaction meme, or a full cartoon episode.
Here’s what to plan:
-
Characters: Who are the stars of your video? A grumpy cat? A superhero?
-
Background Setting: Where does it take place? A school, jungle, or flying UFO?
-
Conflict or Theme: What’s the hook? A cat trying to steal cookies? Teaching ABCs to aliens?
-
Length and Tone: Is it a 30-second short or a 2-minute story? Silly, emotional, or musical?
Pro Tip: Write a quick script or voiceover text alongside your idea. This will help guide the scenes and character animations when you move into the studio.
Step 2: Open AutoDraft AI - Free AI Animation Generator
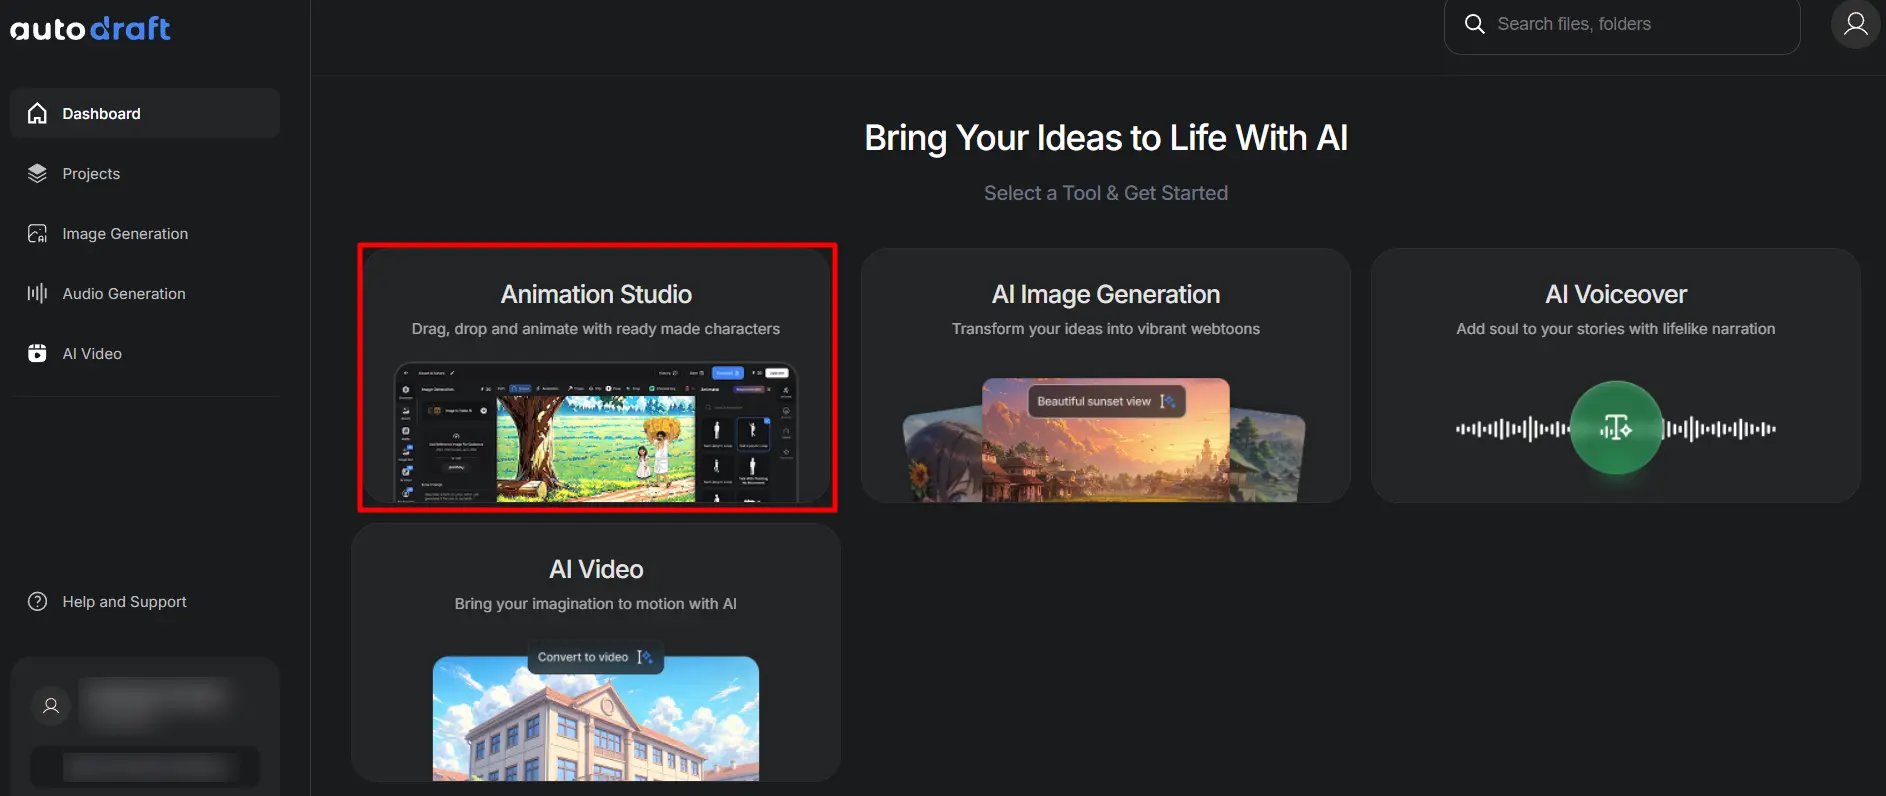
To begin your animation video, head over to Autodraft AI and sign up using your Google, Facebook, or email account.
Once you're inside the dashboard, click on “Create New Project” and choose the format depending on your video type:
- 16:9 for YouTube videos
- 9:16 for YouTube Shorts or Reels
This opens up the Animation Studio, where you can build your video on the timeline using AI tools.
Step 3: Create or Select AI Cartoon Characters
Your characters are the heart of your animated video. Whether it's a superhero, a small kid, or a school teacher, AutoDraft AI gives you total creative freedom to bring them to life, without needing to draw anything yourself.
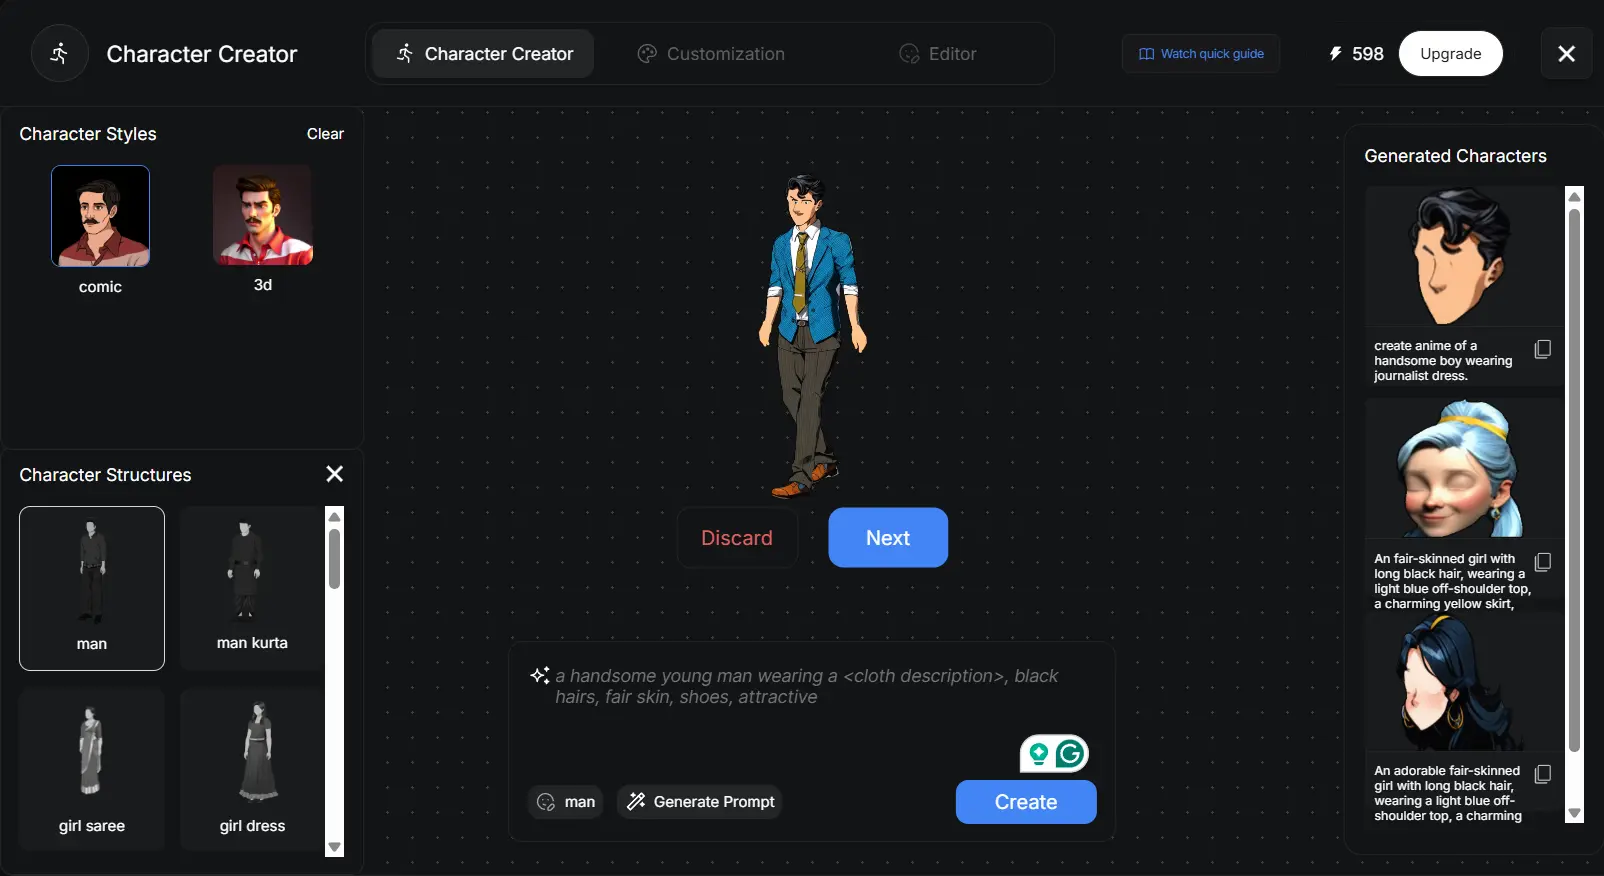
Start by choosing the character style (comic or 3D look), depending on the visual tone you’re aiming for. Then, pick a body structure based on the role your character plays in the story.
In the text field at the bottom, you can write a prompt like:
“A handsome young man wearing a red hoodie, black pants, sneakers, with fair skin and stylish hair.” Click Generate Prompt to get help, or type your own. You can easily customize details like
- Clothes and accessories
- Color schemes
- Facial expressions or mood
- Art style (cute, comic, realistic, etc.)
Then hit Create, and AutoDraft will instantly generate a unique, copyright safe cartoon character based on your description.
Step 4: Design Your Story Backgrounds and Scenes
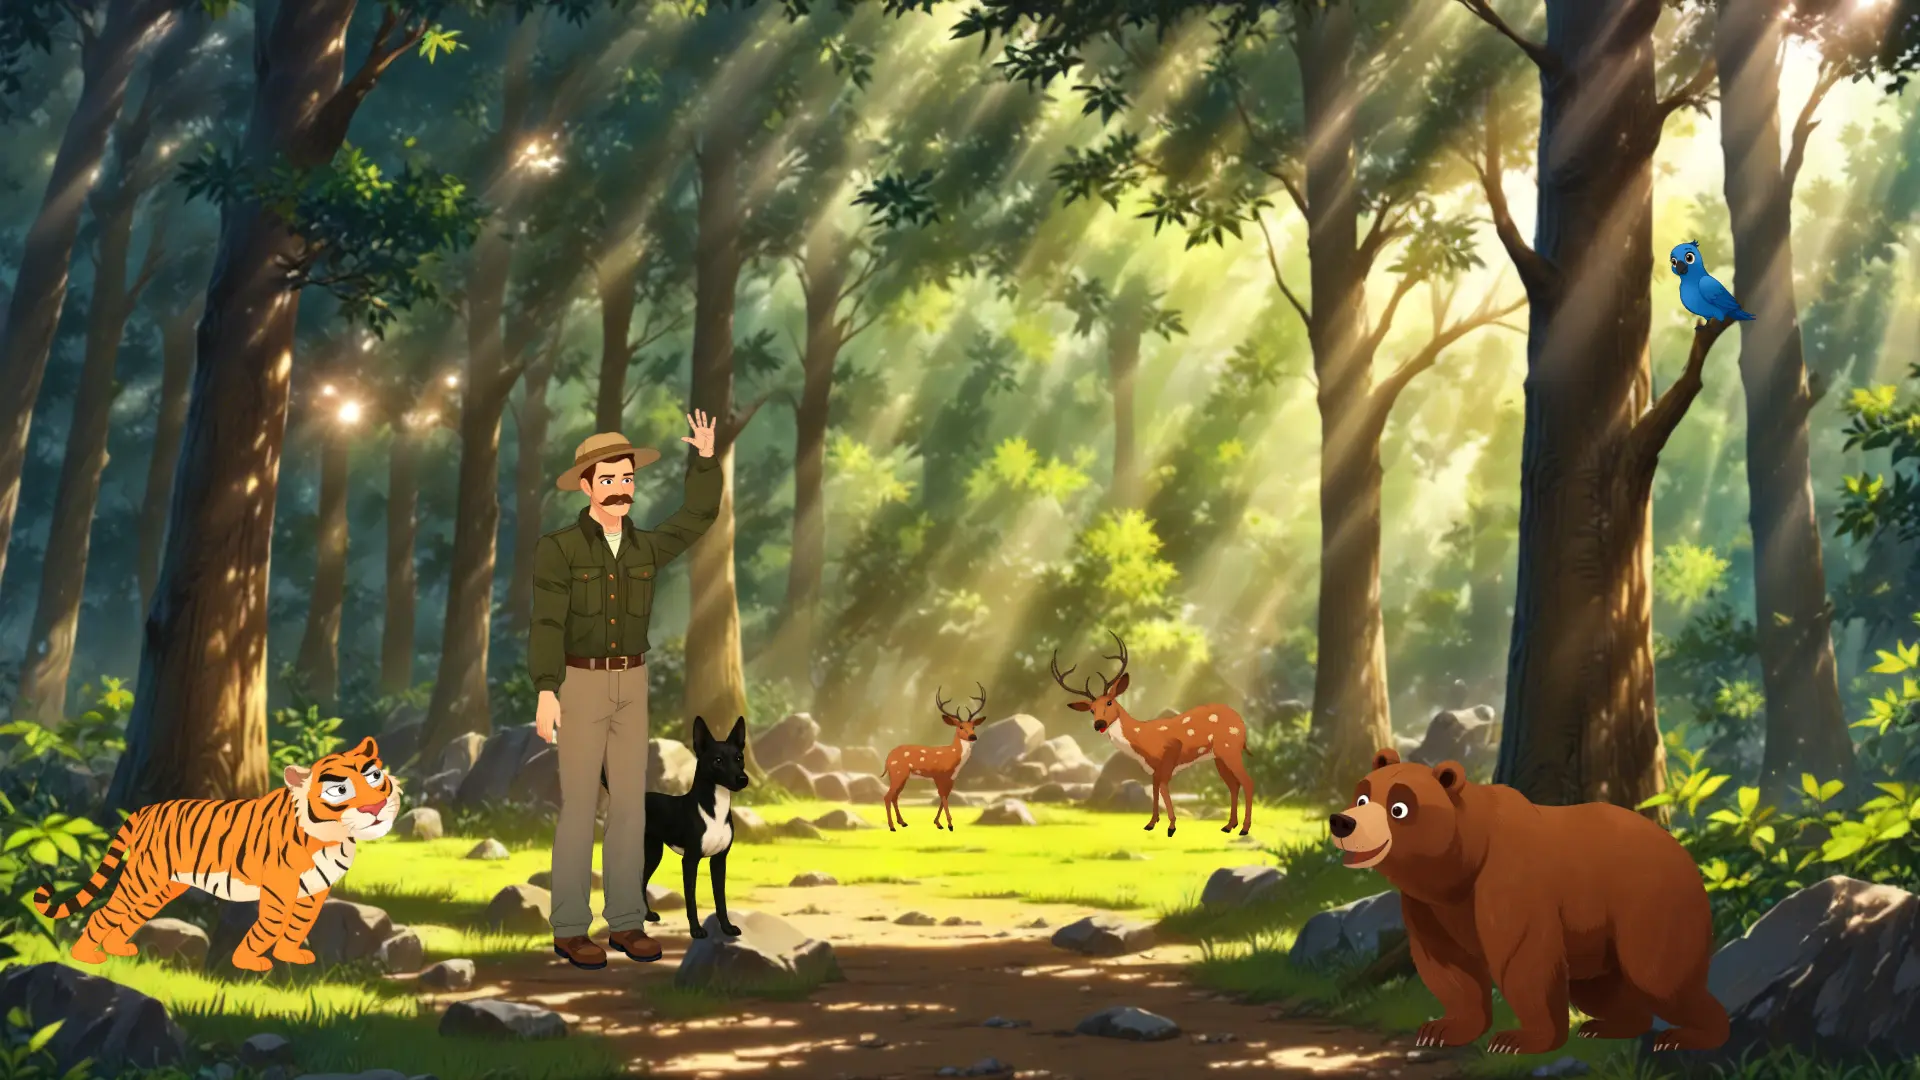
Once your characters are ready, the next step is to design the story world. AutoDraft AI’s Image Generator gives you creative freedom to generate professional-looking cartoon backgrounds and scenes.
You can build a cartoon jungle, a classroom, or an alien planet with complete control.
1. Generate Backgrounds with AI
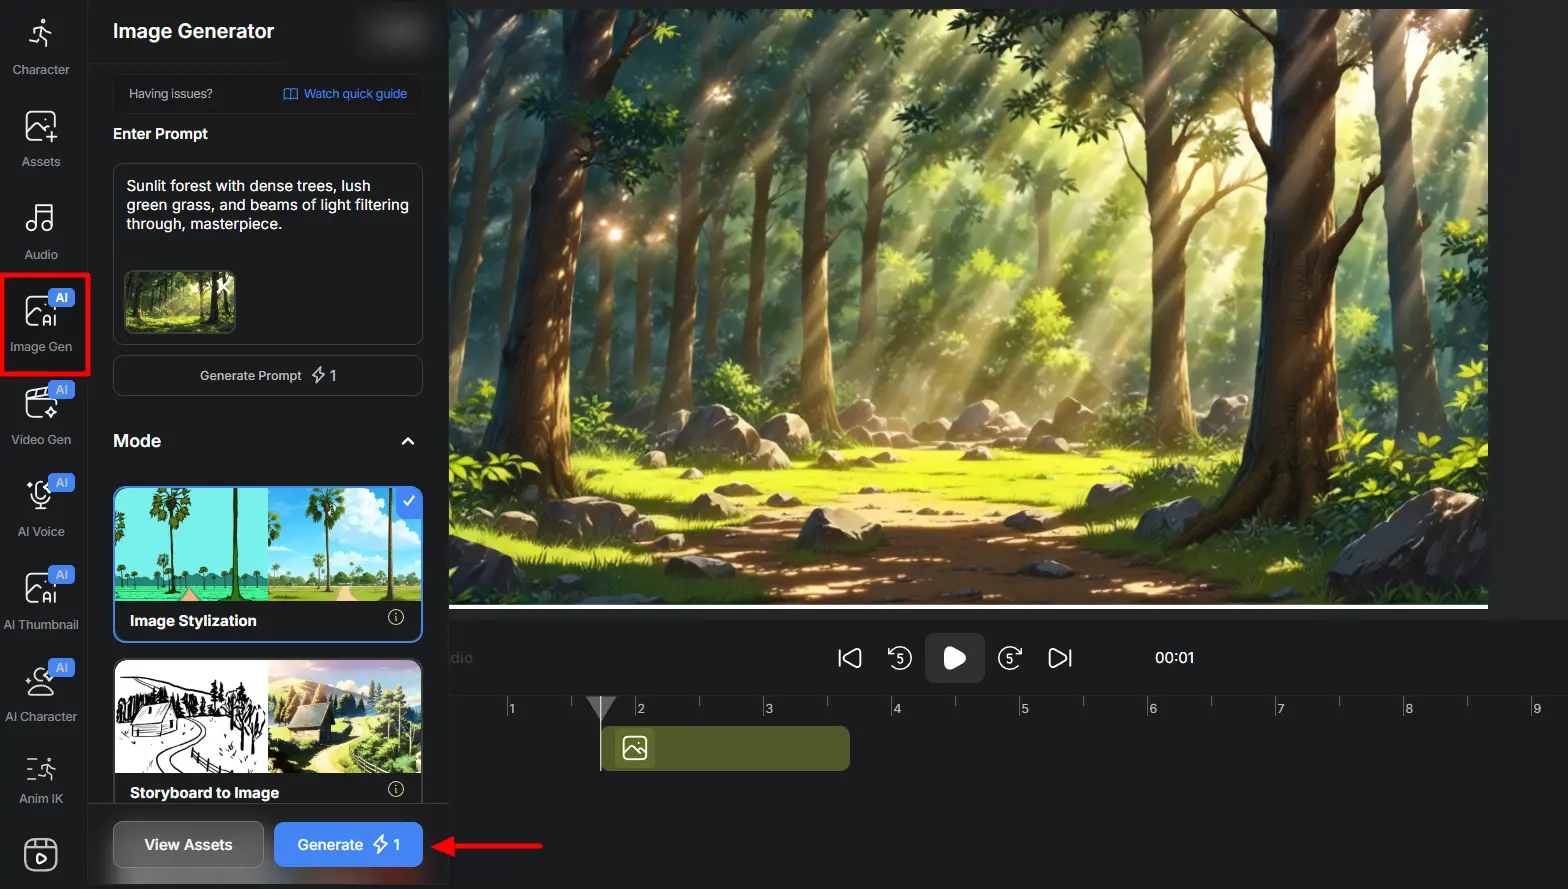
Go to the Image Gen tab. Type in a scene idea like “Sunlit forest with dense trees, lush green grass, and beams of light filtering through.”
With one click, AI will create a fully rendered background based on your description. You can switch between styles like:
- Village Style
- Kids Animation Style
- Thriller Style
- Webtoon, Painting, or Aesthetic Anime Style
- 3D Cartoon Kids Style
These styles help you maintain consistency across different scenes and episodes.
This is perfect for creators who storyboard their videos beforehand or want to turn real-life photos into animated sets.
With this Text to Image tool, you can easily design immersive story settings like sci-fi planets, Hollywood classrooms, and maintain a uniform art style throughout your YouTube video.
If you want to generate ultra-realistic scenes or cinematic cartoon backdrops, learn how to craft better prompts with our guide on How to Get Realistic Images Using AI Image Generator Prompts.
Step 5: Animate Characters
This is where your story comes alive. With the drag-and-drop animation tools, even beginners can create smooth, expressive movements without touching a single keyframe.
1. Add Characters to the Scene
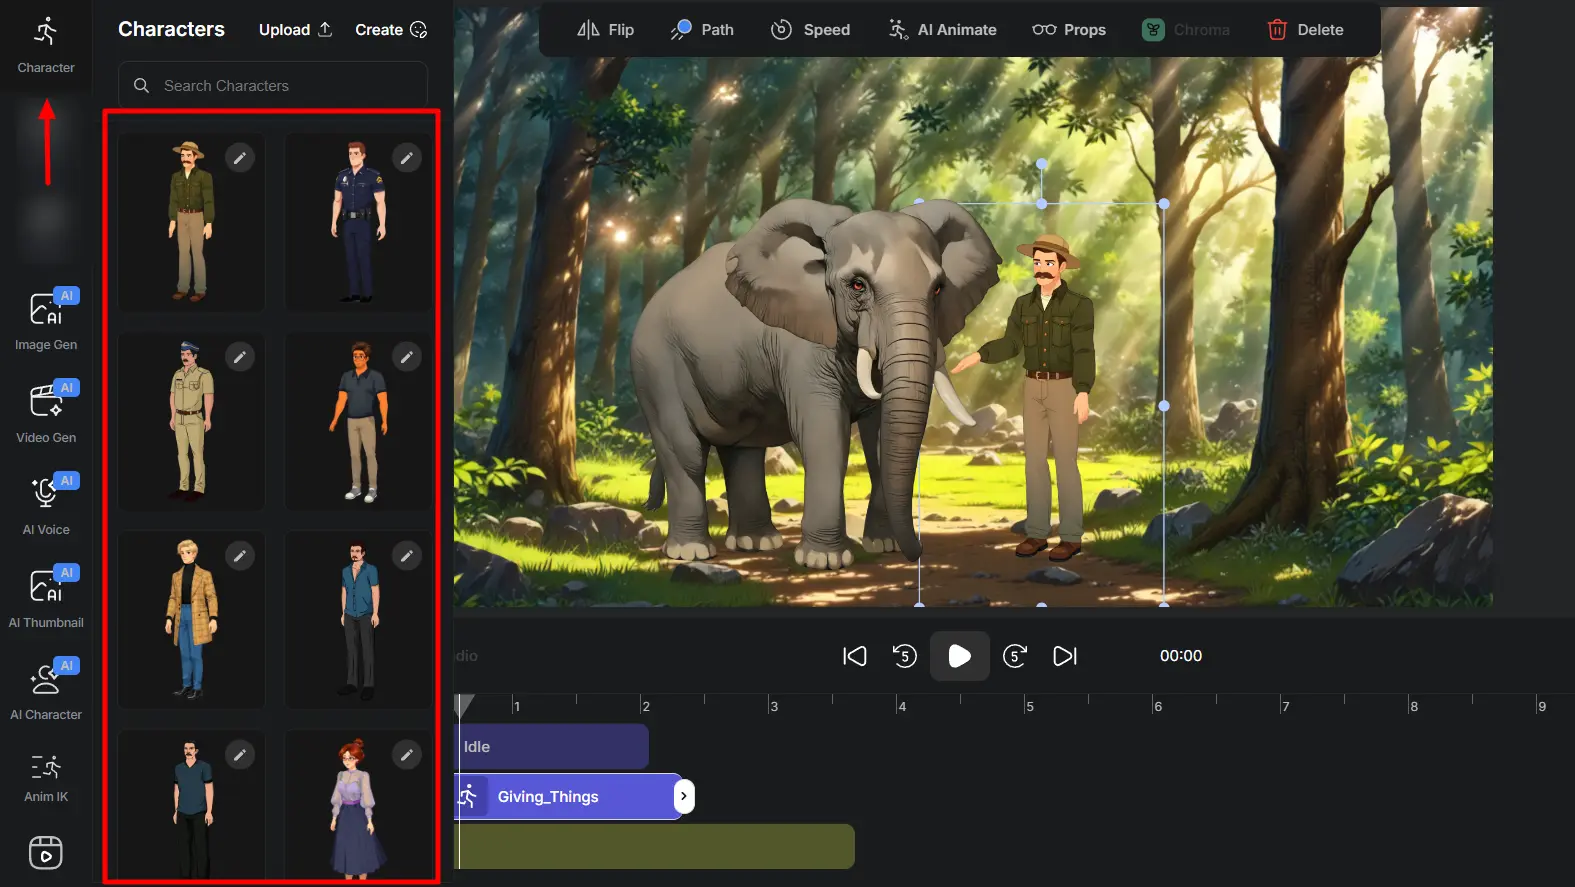
Start by dragging your selected character (like a cartoon animal, bird, creature, or human figure) from the left-side Character Library onto the canvas and timeline.
You can resize, rotate, and place them anywhere on the scene. You can also layer multiple characters to build interactions or group actions.
Want more advanced motion options and pro-level rigging for your characters? Check out our Best Character Animation Toolkit for templates that speed up your workflow.
2. Apply Ready Made Animations
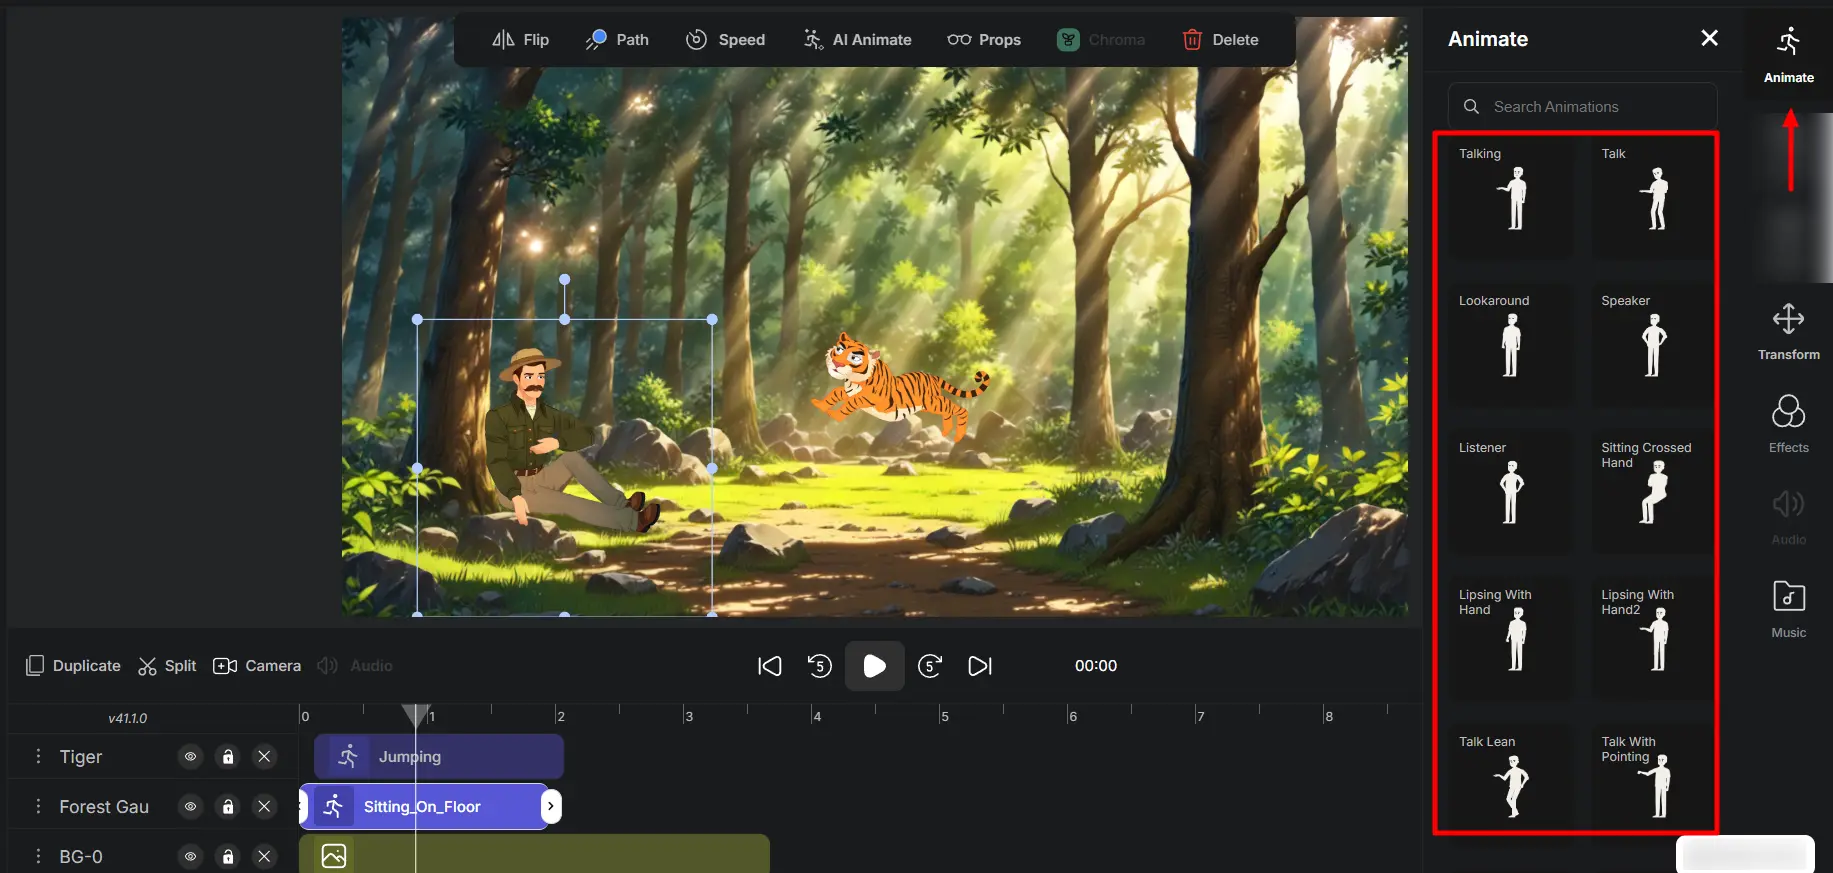
Select the character you want to add actions to. Then navigate to then go to the **Actions **tab on the right side.
From here, choose from 200+ prebuilt animations, such as walk, dance, sit, laugh, cry, talk, jump, sleep, run, and many more.
Each animation can sync with the timeline. No need for rigging or manual adjustments. This makes it easy to build lifelike motion sequences instantly.
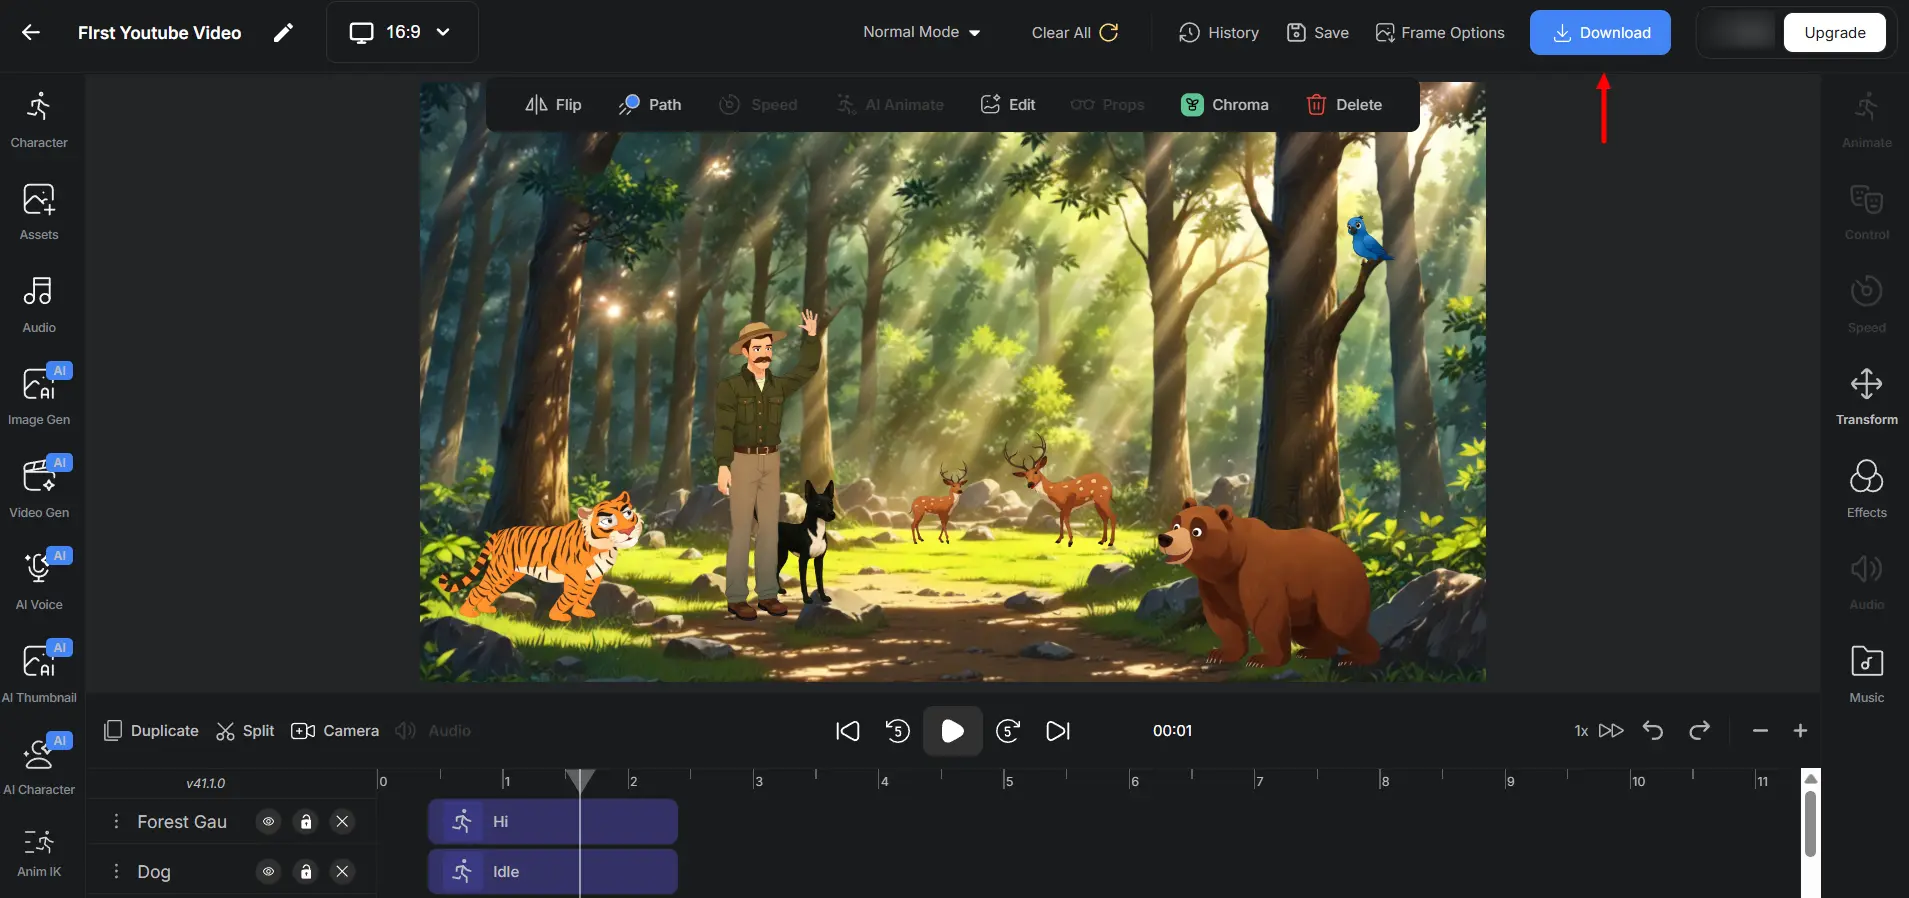
3. Use Motion Paths for Natural Movement
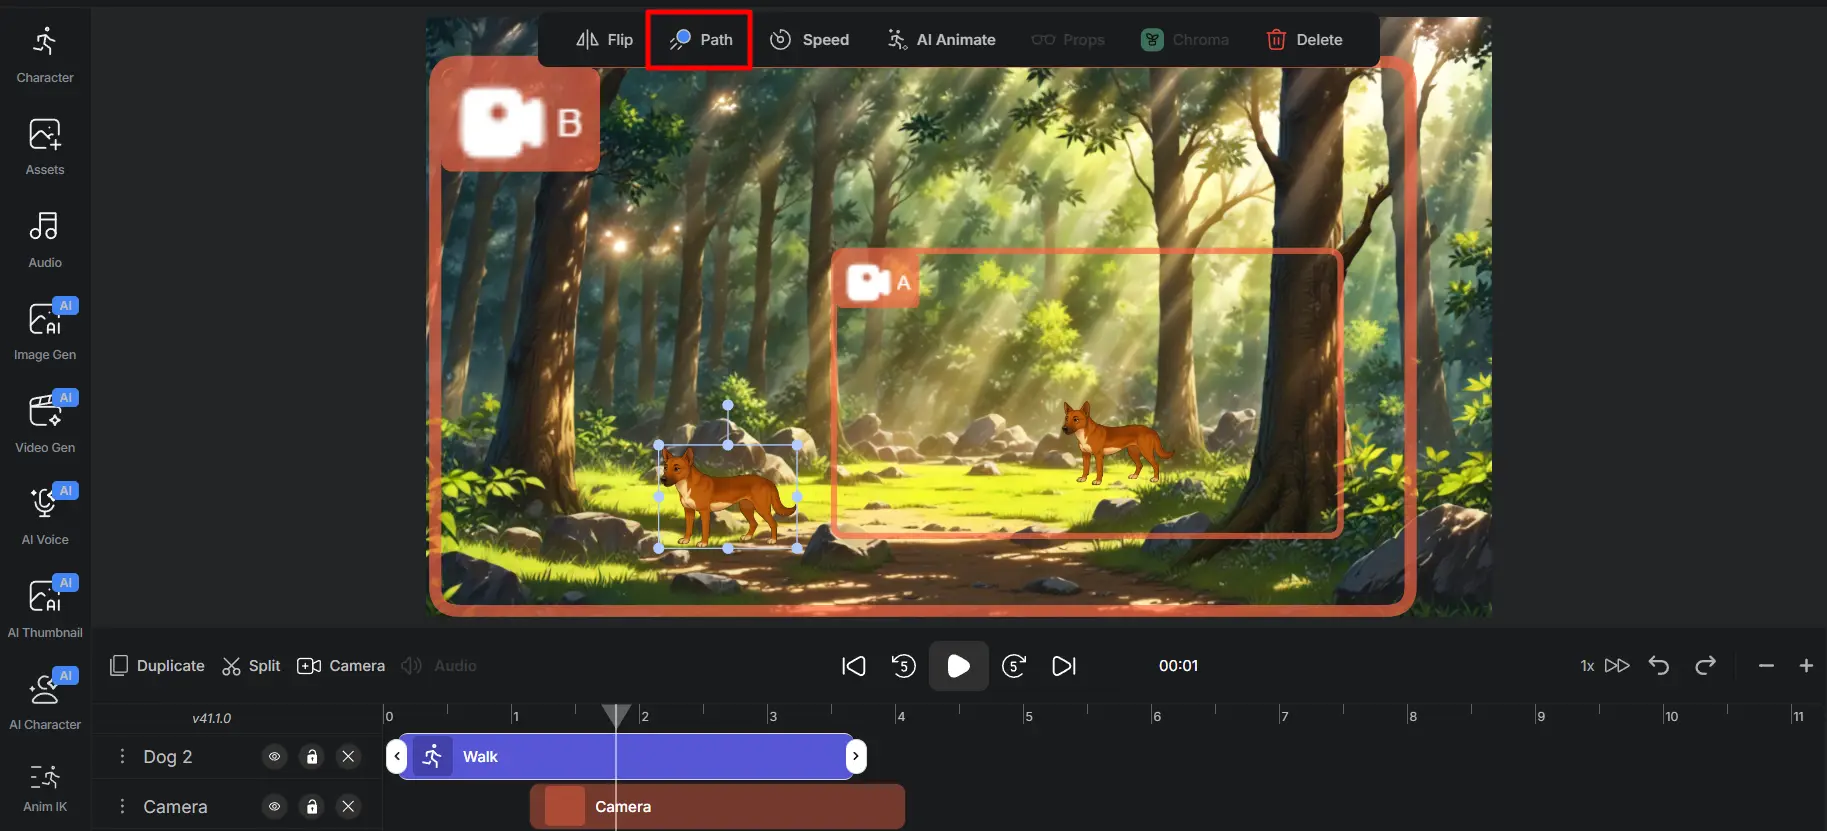
To move your character across the screen, click the Path button on the top bar.
-
Draw a line from **point A **to point B and set the movement speed.
-
Hit play, and your character will smoothly follow the drawn route.
You can combine walking animations with motion paths for ultra-realistic travel or movement across scenes.
You can also animate the camera to pan or zoom in sync with your character, making your scenes more cinematic and immersive.
This animation system saves you hours of keyframing while still producing professional quality cartoon motion for your YouTube videos.
Step 6: Add AI Generated Audio and Voiceovers
Sound brings your animation to life, whether it’s a dramatic voiceover or a playful background tune.
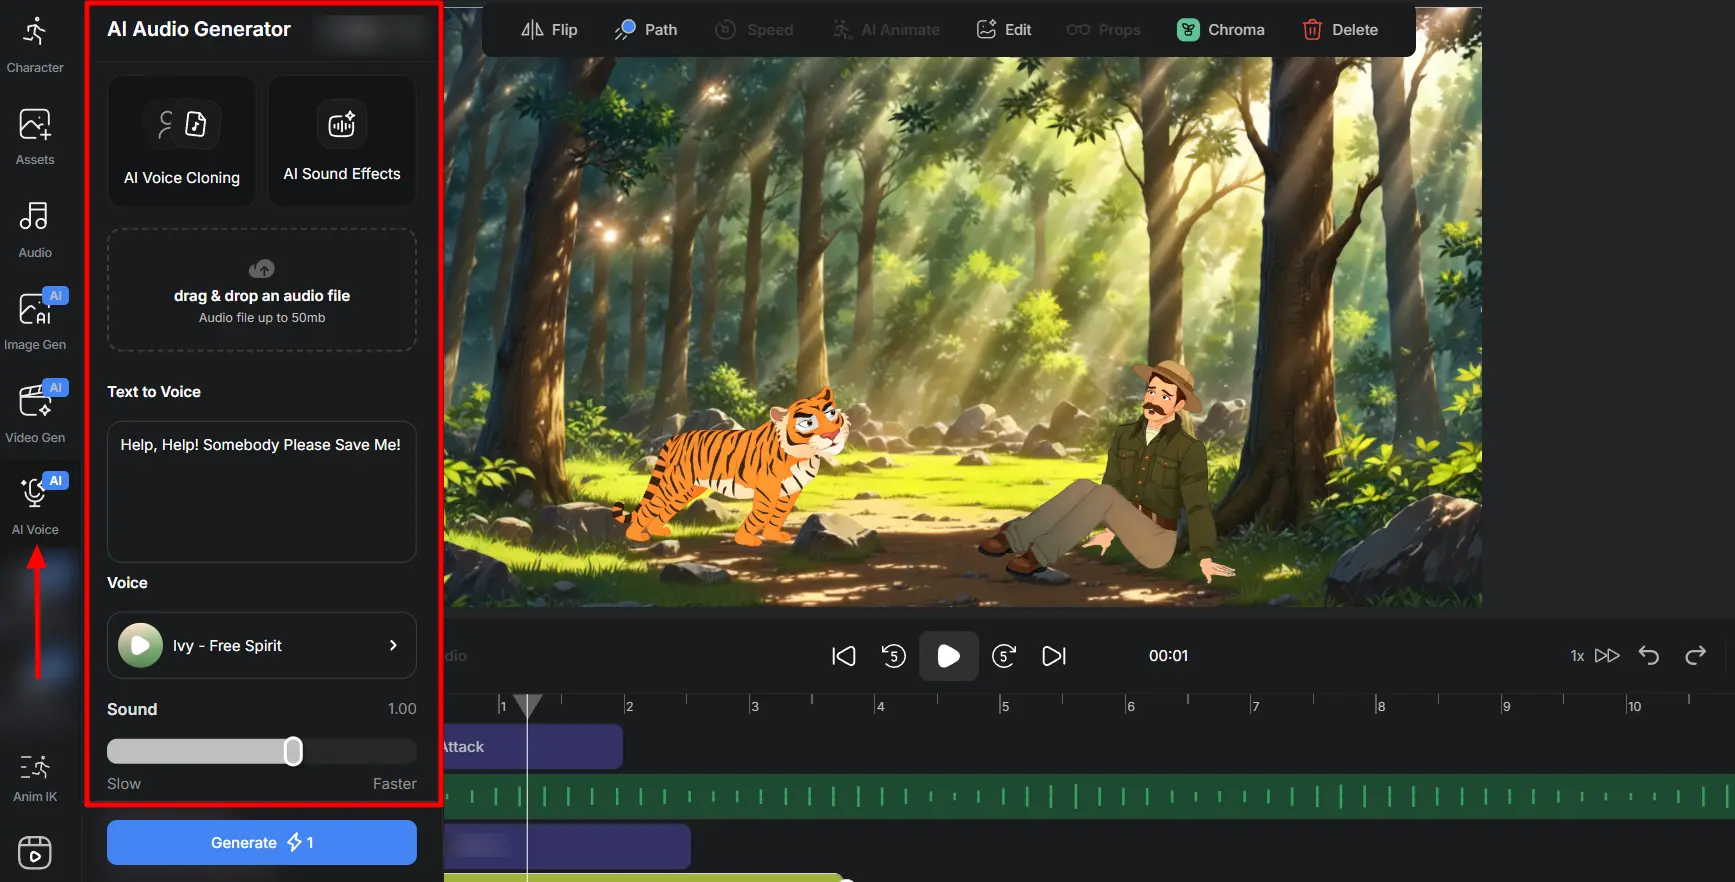
Go to the Voiceover Tool in AutoDraft. Type your script and choose from dozens of AI voice styles (male, female, child, cartoonish, serious). Adjust the speed, pitch, or accent if needed.
Hit Generate and download the voice file directly. Drag the downloaded audio clip onto the timeline.
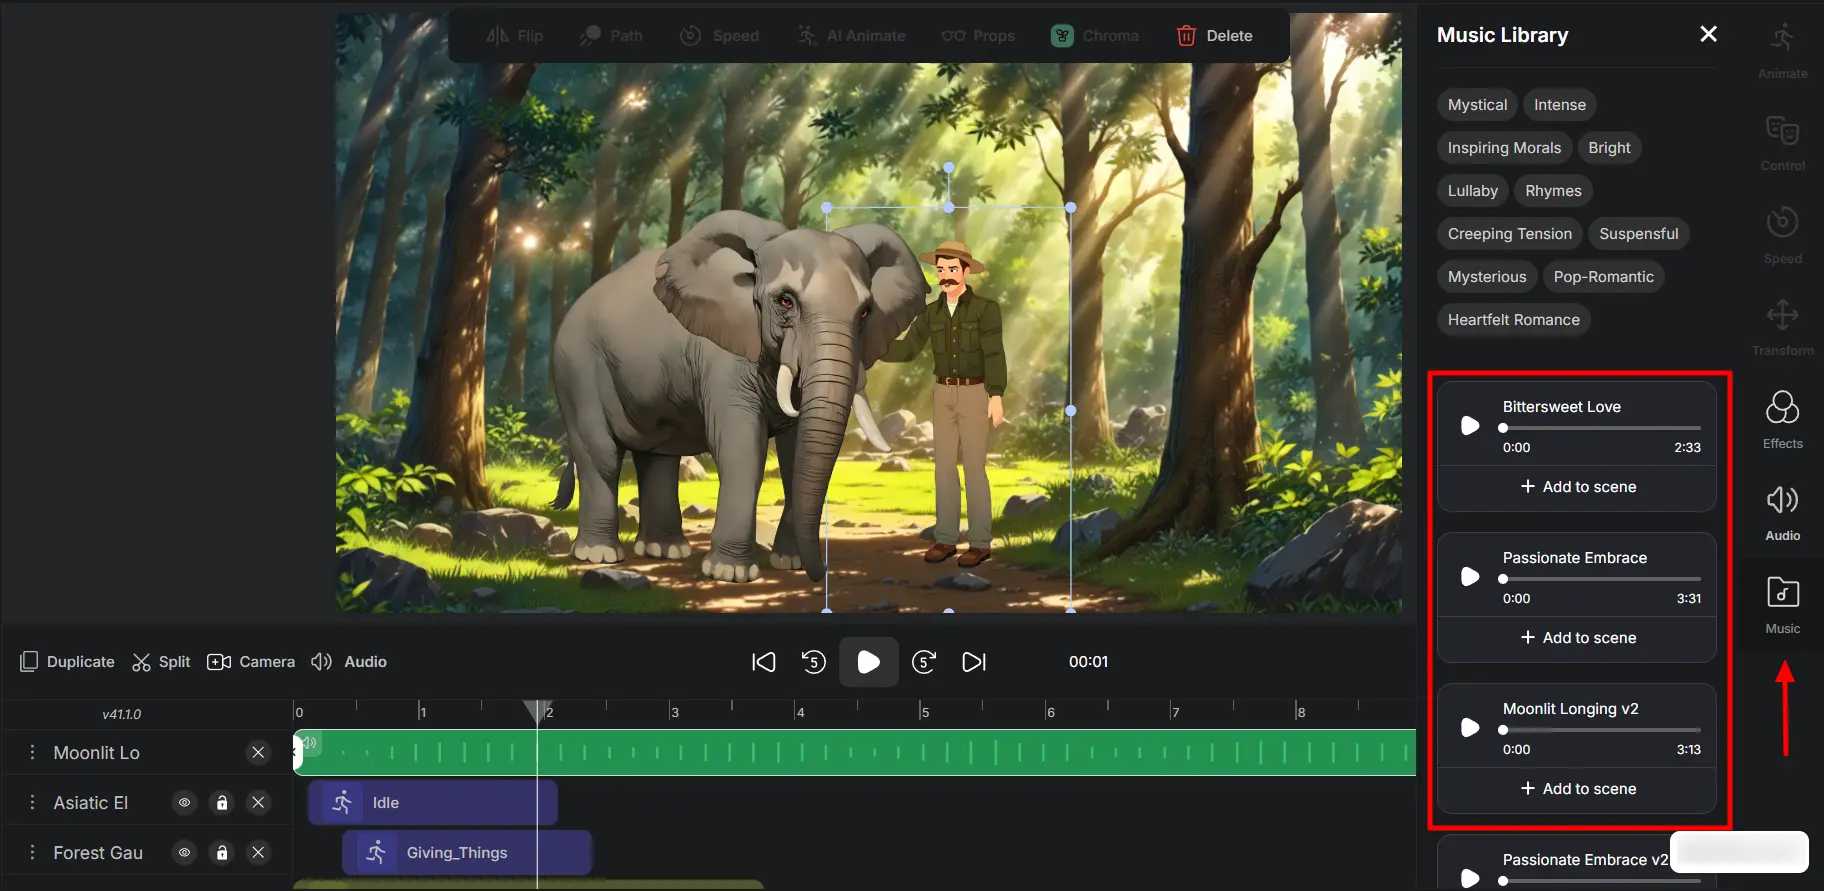
You can also use the Music Library, which includes preloaded audio and sound effects. Use multiple audio tracks for dialogue, music, and sound effects (SFX).
Whether you want to lip sync your character or add music to enhance the emotion, this step adds a rich layer of storytelling to your animated video.
If you’re new to AI voiceovers or want help choosing the right voice style, check this beginner’s guide to Convert Text to Audio: Free AI Voice Generator.
Step 7: Create a Full Animated Story
Now that your assets are all in place, it’s time to bring everything together into a complete, coherent animated video.
Combine all the elements that we have created in the timeline. Use the platform's drag-and-drop editor to arrange your characters, backgrounds, animations, and audio tracks.
Adjust the timing of each layer to ensure everything flows naturally—scene transitions, character actions, and voice lines should sync seamlessly.
- Break your story into multiple scenes or shots if needed.
- Duplicate characters and reuse backgrounds for continuity.
- Use **zoom, pan, **and fade transitions to keep the visual flow dynamic.
Click Play on the timeline to review your full animation.
Watch for glitches in timing, off-sync audio, or missing elements. Correct all scenes until you're satisfied with the pacing and storytelling.
Once your animation is complete, click on the Download button. AutoDraft will compile your characters, animations, backgrounds, and audio into a high-quality video file.
How to Upload YouTube Videos Online

Uploading a video the right way can improve views and search visibility. Follow these steps:
Step 1: Go to YouTube Studio
From the YouTube Studio homepage, click the camera icon in the top right corner and select “Upload video”.
Step 2: Add a Title & Description
Use a title that’s short, clear, and includes your keyword.
For example: “Cartoon Cat Sings Meow Meow Song – Funny Kids Animation”.
In the description box, explain what the video is about, use keywords naturally, and add links. Make sure the first 2 lines are attention-grabbing.
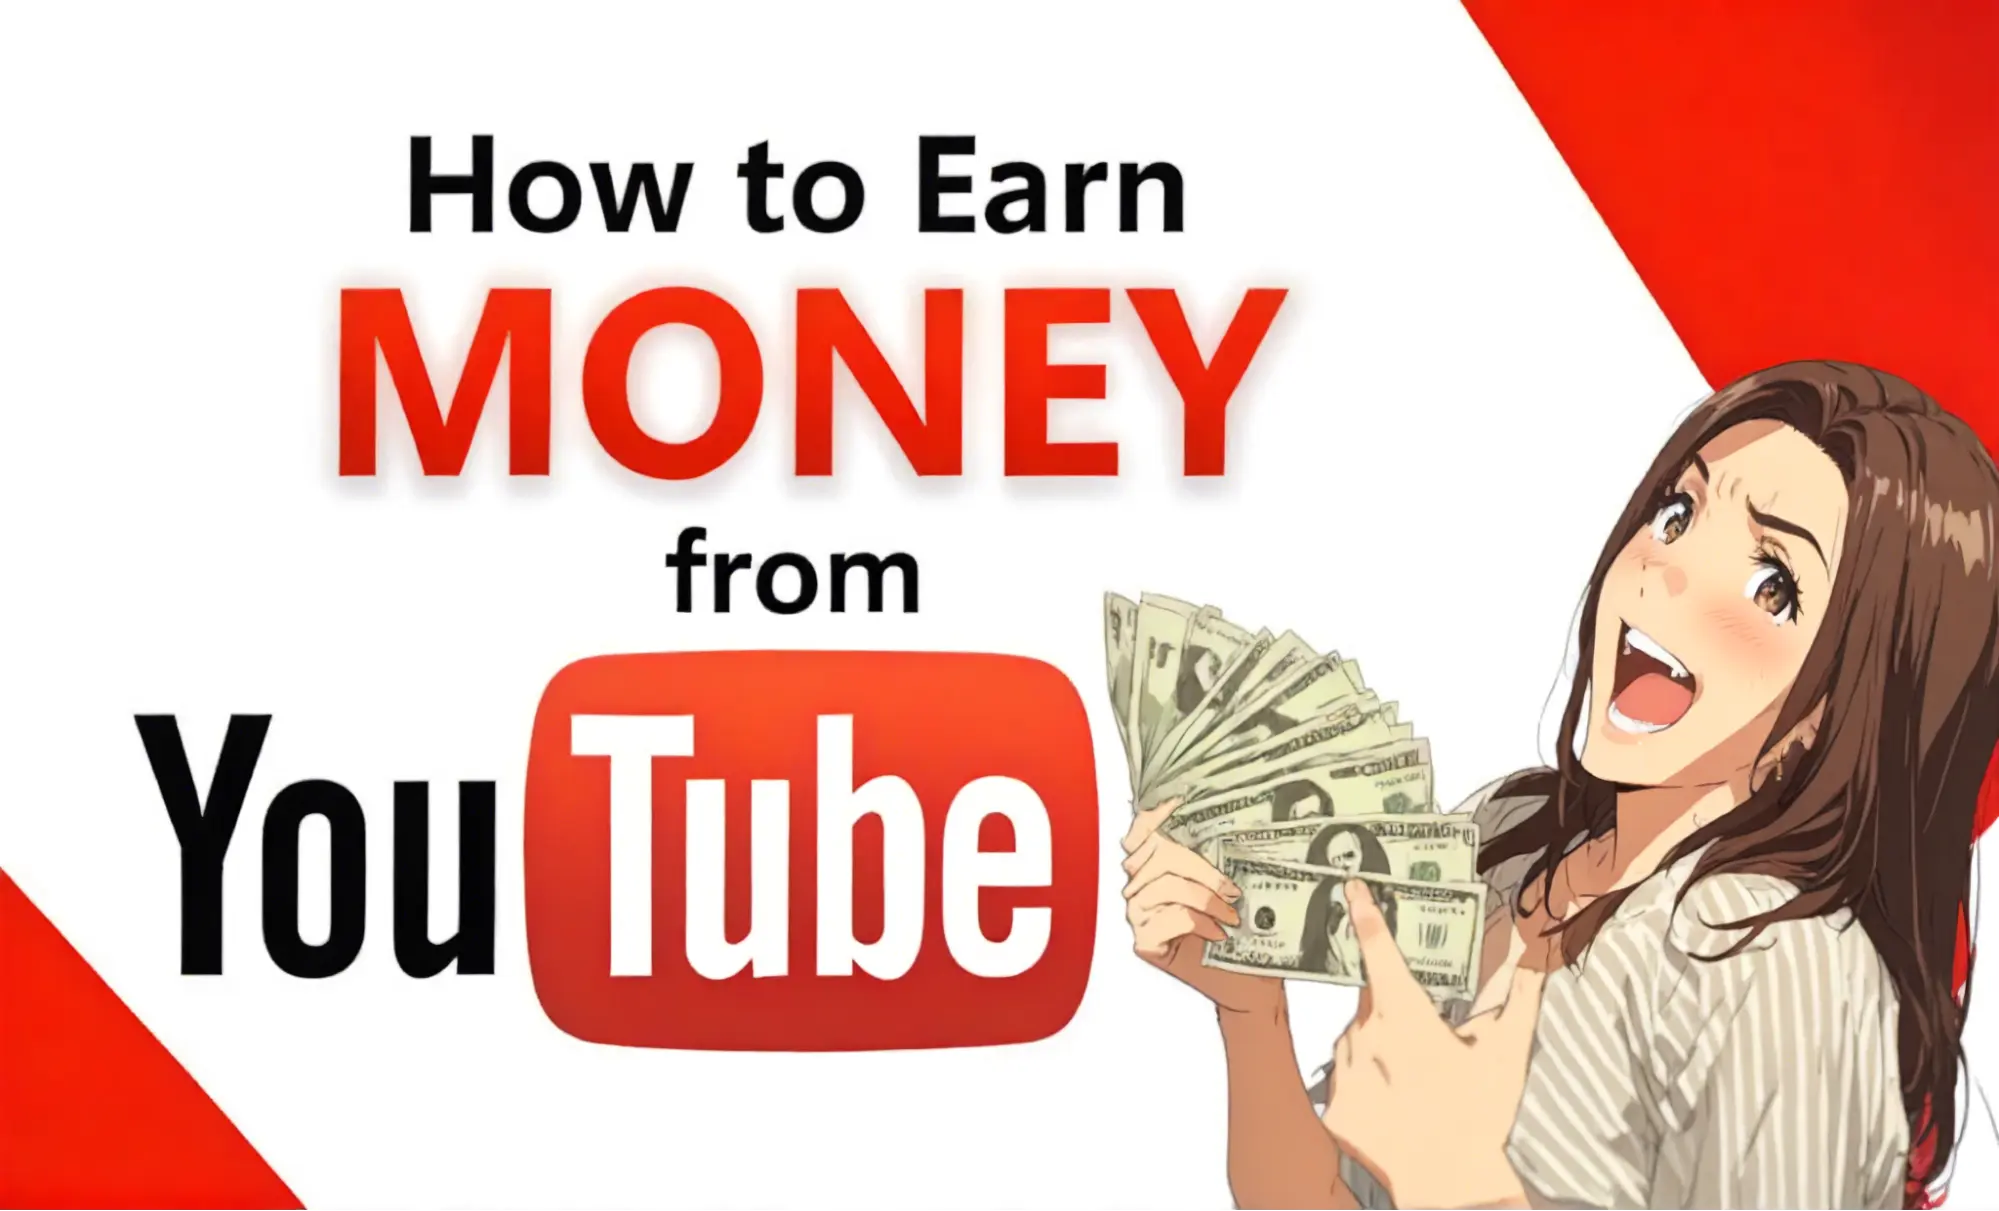
Step 3: Upload a Thumbnail
YouTube auto-generates thumbnails, but uploading your own image can drastically improve click-through rates. Make sure it’s colorful, expressive, and easy to understand.
Step 4: Add Tags & Set Audience
Don't forget to add tags that are relevant to your video. This helps YouTube understand your content and show it to the right viewers.
cartoon cat, funny animation, meow song, kids video.
Mark “Yes, it’s made for kids” if applicable.
Step 5: Publish or Schedule
Choose “Public” when you’re ready to go live. If you want to schedule it, select a future date and time to publish automatically.
Once your video is live, promote it across your social channels and monitor how it performs.
How Does the YouTube Partner Program Work
Once you've created and uploaded your animated video using AutoDraft AI, the next goal is to monetize it—and that's where the YouTube Partner Program (YPP) comes in.
The YPP allows content creators to earn money from ads, memberships, and fan support features on their videos. But to get started, your channel needs to meet certain requirements:
Eligibility Criteria for Getting Paid on YouTube:
✅ 1,000 subscribers minimum.
✅4,000 valid watch hours in the past 12 months or 10 million valid Shorts views in the past 90 days.
✅Must be in an eligible country (India, USA, and 135+ others).
✅No active Community Guidelines strikes.
✅Google AdSense account linked for receiving payments.
✅Two-step verification is enabled on your Google account.
There’s also a lower-tier version of the program available in some regions, where channels with 500 subscribers and 3,000 watch hours or 3 million Shorts views in 90 days may also apply.
What Content Earns Money On YouTube
Once your YouTube account is approved, you can make money from the following:
-
Ads (skippable, non-skippable, banner, etc.) shown on your videos.
-
Channel Memberships (paid subscribers).
-
Super Chat, Super Stickers, and Super Thanks during livestreams and premieres.
-
YouTube Premium revenue (when Premium users watch your content).
-
Merchandise Shelf (for eligible channels to showcase products).
Creators get access to better analytics, copyright tools, and promotion options through YPP.
Key Takeaways – Start Creating, Start Earning
YouTube is one of the most powerful platforms to make money onlineand animation is one of the most engaging content formats.
But remember you only earn when ads are watched or clicked. Also content type, audience region, and engagement level affect your pay.
Using AutoDraft AI, you have a full-stack animation studio in your hands. You can try different video styles and discover what connects with your audience. Create:
-
Horror story animations that go viral at night
-
Funny animal videos that melt hearts
-
Gaming highlights with animated commentary
-
Nursery rhymes and kids content with safe characters
-
Informative explainers with AI voiceovers
-
Product review videos with animated hosts
AutoDraft AI helps you create all of these without needing animation skills, big budgets, or complex software. It’s a one-stop studio for creators who want to grow fast and monetize smart.
There’s no limit to the stories you can tell, and no need for animation skills.
Ready to bring your first animated video to life? Head over to AutoDraft.ai and start creating for free.
Your next viral YouTube video could be just a few clicks away.
Check out more informative articles on:
-
How to Create Nursery Rhymes & Kids Songs For YouTube: Ultimate Tutorial
-
How to Create YouTube Thumbnails Free Download - AutoDraft AI
FAQ
1. How Much Does YouTube Pay Per 1,000 Views?
YouTube pays creators based on ad views, not just total video views. On average, creators earn between $2 to $12 per 1,000 monetized views, depending on niche, location, and viewer interaction with ads.
2. What’s The Best Way To Earn From YouTube Shorts?
Shorts generate less ad revenue, but creators can still earn through the YouTube Shorts Fund, brand deals, and by driving traffic to long-form content. Use engaging hooks and high-retention storytelling to go viral.
3. Do I Need Animation Skills To Create YouTube Videos?
Nope. With AutoDraft AI, you can build fully animated videos using text prompts and drag-and-drop tools. It handles character creation, background design, voiceovers, and animation—even if you’ve never edited a video before.
4. How Many Views Do I Need To Start Making Money?
You’ll need 1,000 subscribers and 4,000 valid watch hours (or 10 million Shorts views in 90 days) to join the YouTube Partner Program and start monetizing with ads.
5. Can I Use AI Tools Like AutoDraft To Grow Faster?
Yes. AutoDraft AI helps creators produce more videos, more often. With built-in AI tools for animation, voiceovers, and design, you can focus on storytelling instead of editing—perfect for growing your channel quickly.
6. Is There A Free Plan For AutoDraft AI?
Yes. AutoDraft AI offers a free plan with access to core features like character animation, voice generation, and scene creation. It’s ideal for new YouTubers starting out without a budget.